How to Make a Drama-Style Song VSL With AI: The Full Process
Ori Silver
·
Co-founder, Maxfusion AI
·
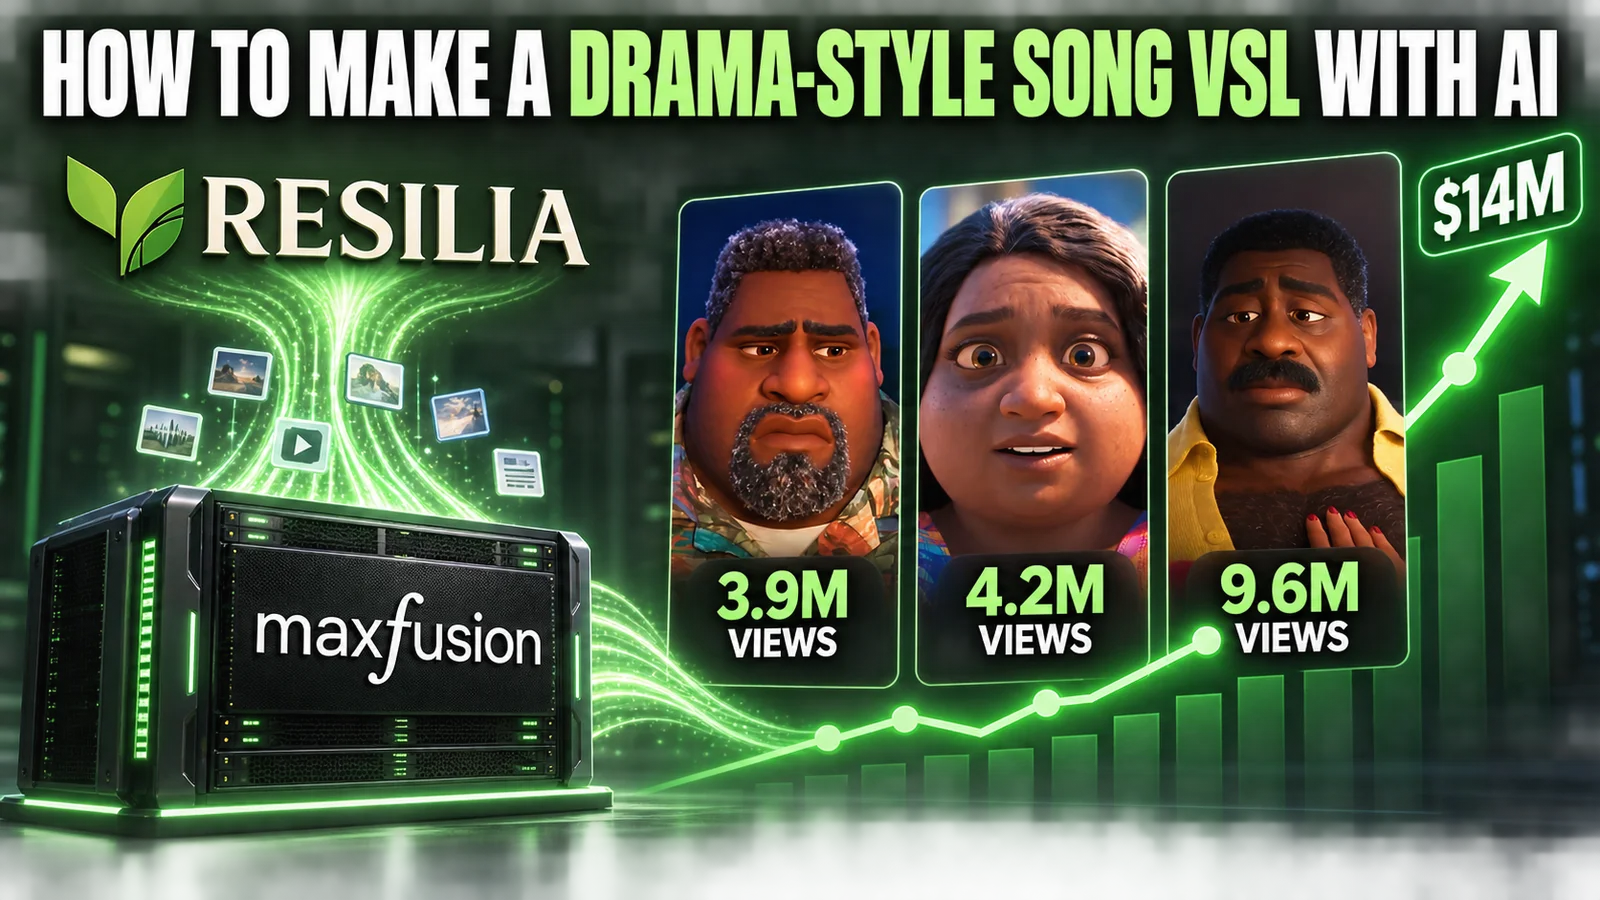
You’ve probably seen Resilia’s drama-style song VSLs. Resilia sells an oregano oil and black seed oil softgel, and it makes an estimated eleven to fourteen million dollars a year, much of it from this exact format: a five-to-ten-minute mini drama, delivered as a song, that speaks directly to the sub-avatar.
I analyzed their top-performing ads and took apart the blueprint behind them.
This guide shows you how to make the same kind of drama-style song VSL, step by step, from the script to the finished edit. It covers both routes: doing it through the Maxfusion AI MCP, and doing it by hand.
The finished ad first

The ad above is for LC by Maxfusion, a lymphatic support complex. It was made with the exact process in this article.
The process at a glance
1. Script: write the drama on the hero’s journey.
2. Song: turn the script into a song, word for word.
3. Timing map: find the exact second every word is sung.
4. Character sheets: build a reference sheet for every character.
5. Shot sheets: draw every shot as a grid of four frames.
6. Videos: turn each shot sheet into a clip.
7. Edit: stitch the clips in order and lay the song underneath.
Every stage after the script and the song is built to match them, so get those two right before you touch a single image.
Choose a genre and a pace that let every word be heard clearly and never cut a line in an important place.
I worked through the Maxfusion MCP, so Claude created a new project for the ad at the start, and every image and every video was saved there, organized in one place.
Stage 1: the script
The script is the backbone of the entire ad. In any format, a good script carries most of the weight of a successful ad, and in a VSL like this it carries almost all of it, because the story is the ad. If the story is weak, the visuals mean very little.
Start with the product and the sub-avatar: what the product does, who the ad is for, and the fear that person keeps to themselves. The sub-avatar decides every character and every scene.
The story follows a very specific hero’s journey, drawn as a fall and a rise.
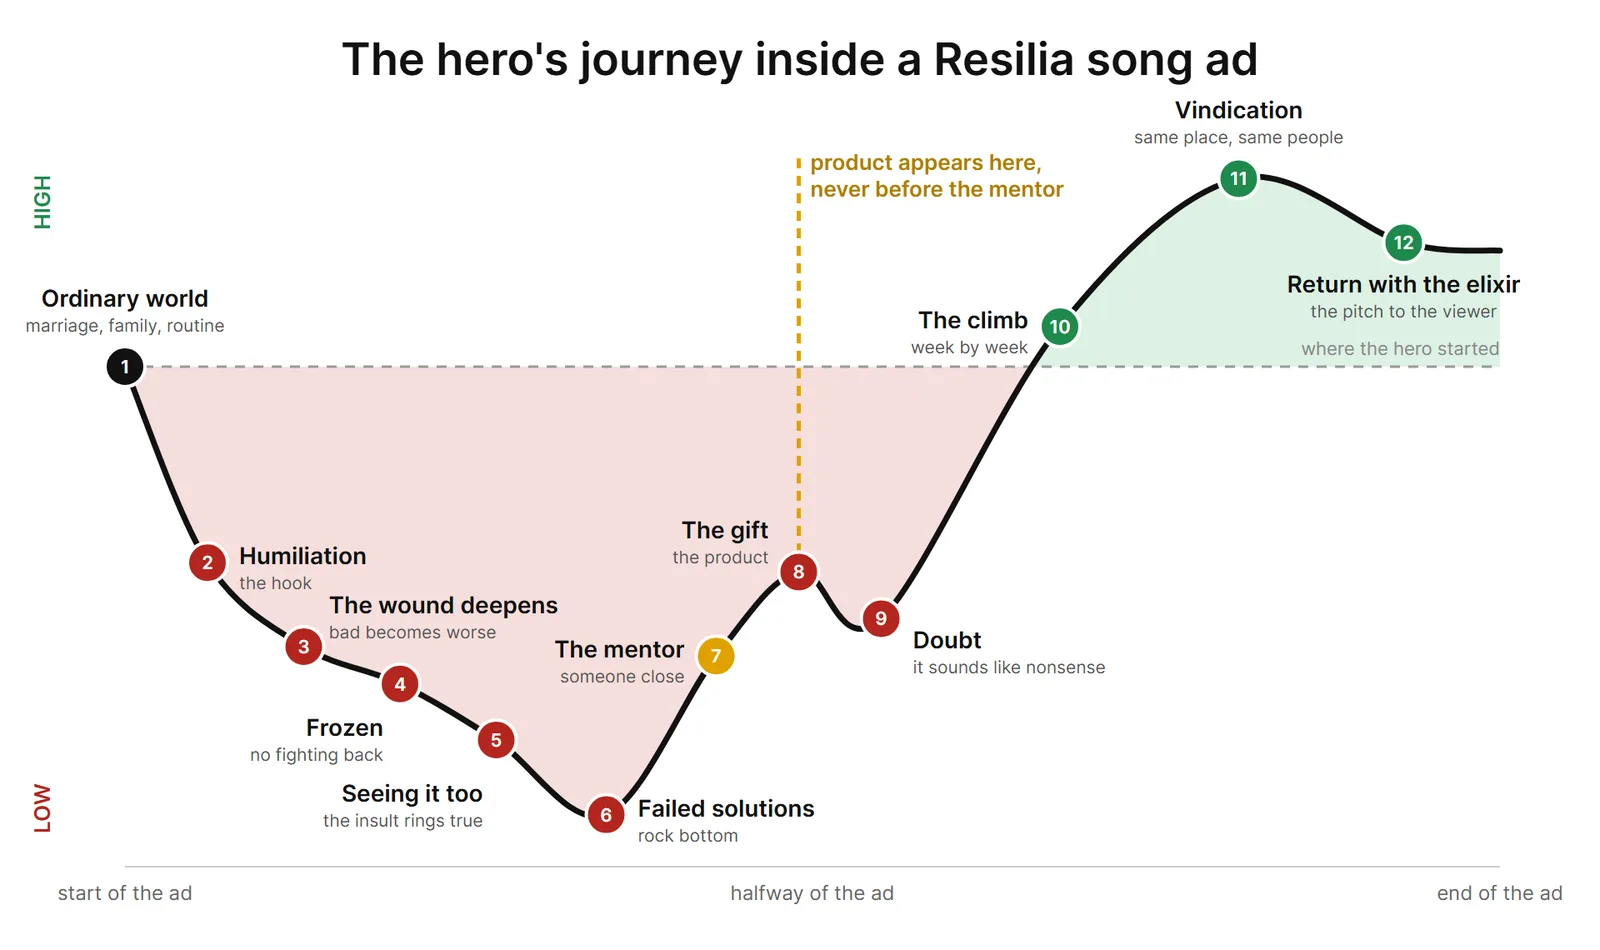
Brainstorm a few story arcs with Claude before you commit to one, then flesh out the one you pick. For each arc, pin down the hook line, the betrayer, the mentor, the truth the mentor reveals, and the vindication scene. Example: a wife whose husband cropped her out of the family photo, a college roommate who is now a lymphatic therapist, and a graduation where he asks the photographer for a photo of just her.
The overview of the story. The first half is pain. The hero is humiliated and it gets worse, then they freeze, see that the insult is true, and hit rock bottom after every fix fails, including the advice of friends and the usual authority figures. Around the halfway point a close, credible mentor reveals the truth and hands over the product. The second half is the climb: doubt, then week-by-week changes other people notice, then vindication in the same place as the humiliation. The last minute or so is the pitch to the viewer.
Write the script as lyrics, in the first person, with short lines and one idea per line. Seven to ten minutes of song is roughly 1,100 to 1,500 words.
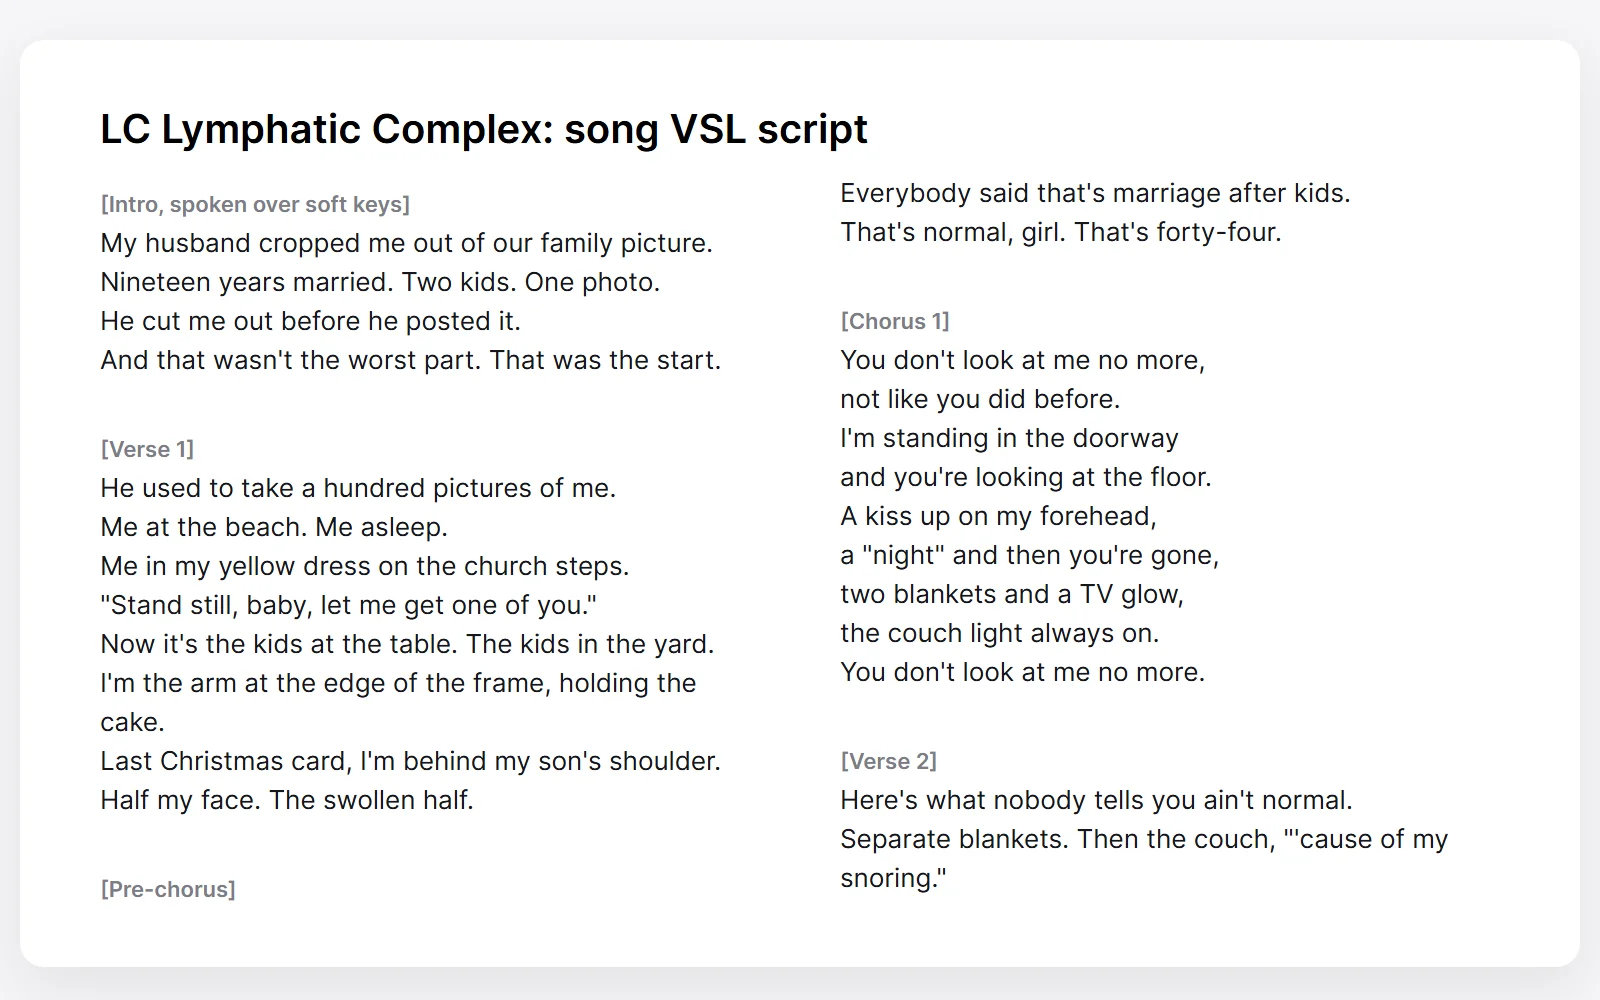
Stage 2: the song
Once the script is done, there are two ways to turn it into a song.
I used the Maxfusion MCP, which has access to all the latest music models, so Claude sent the lyrics straight from the chat, at the same quality you’d get anywhere else.
If you have a Suno account, you can do it yourself: log in, paste the lyrics, pick a style, and generate.
Either way, give the model the script as the lyrics and ask for it to be sung exactly as written. Pick a voice that matches the narrator. Example: slow R&B with a female vocalist in her forties.
A drama-style VSL is long, and Suno caps the lyrics at 5,000 characters, so the whole song won’t fit in one generation and you’ll need two. Keep the style prompt exactly the same in both. End the first part on a chorus in the middle of the story and let it ring out with no outro, so it can crossfade into the second part, which starts right on the vocal with no intro.
Part one:
Style: Slow-burn contemporary R&B, 110 BPM, in A minor, female vocalist in her 40s, warm and soulful, half-sung verses with intimate spoken lines, soft keys and rim-click groove, strips down in the verses, full lift on the choruses and the results verse, spoken outro over the beat. End on the chorus, let it ring out.
Part two:
Style: Slow-burn contemporary R&B, 110 BPM, in A minor, female vocalist in her 40s, warm and soulful, half-sung verses with intimate spoken lines, soft keys and rim-click groove, strips down in the verses, full lift on the choruses and the results verse, spoken outro over the beat. Start directly on the vocal, no intro.
Then have Claude crossfade and stitch the two parts together locally, and you have the full song. If you made the parts in Suno yourself, you can also join them by hand in CapCut.
Stage 3: the timing map
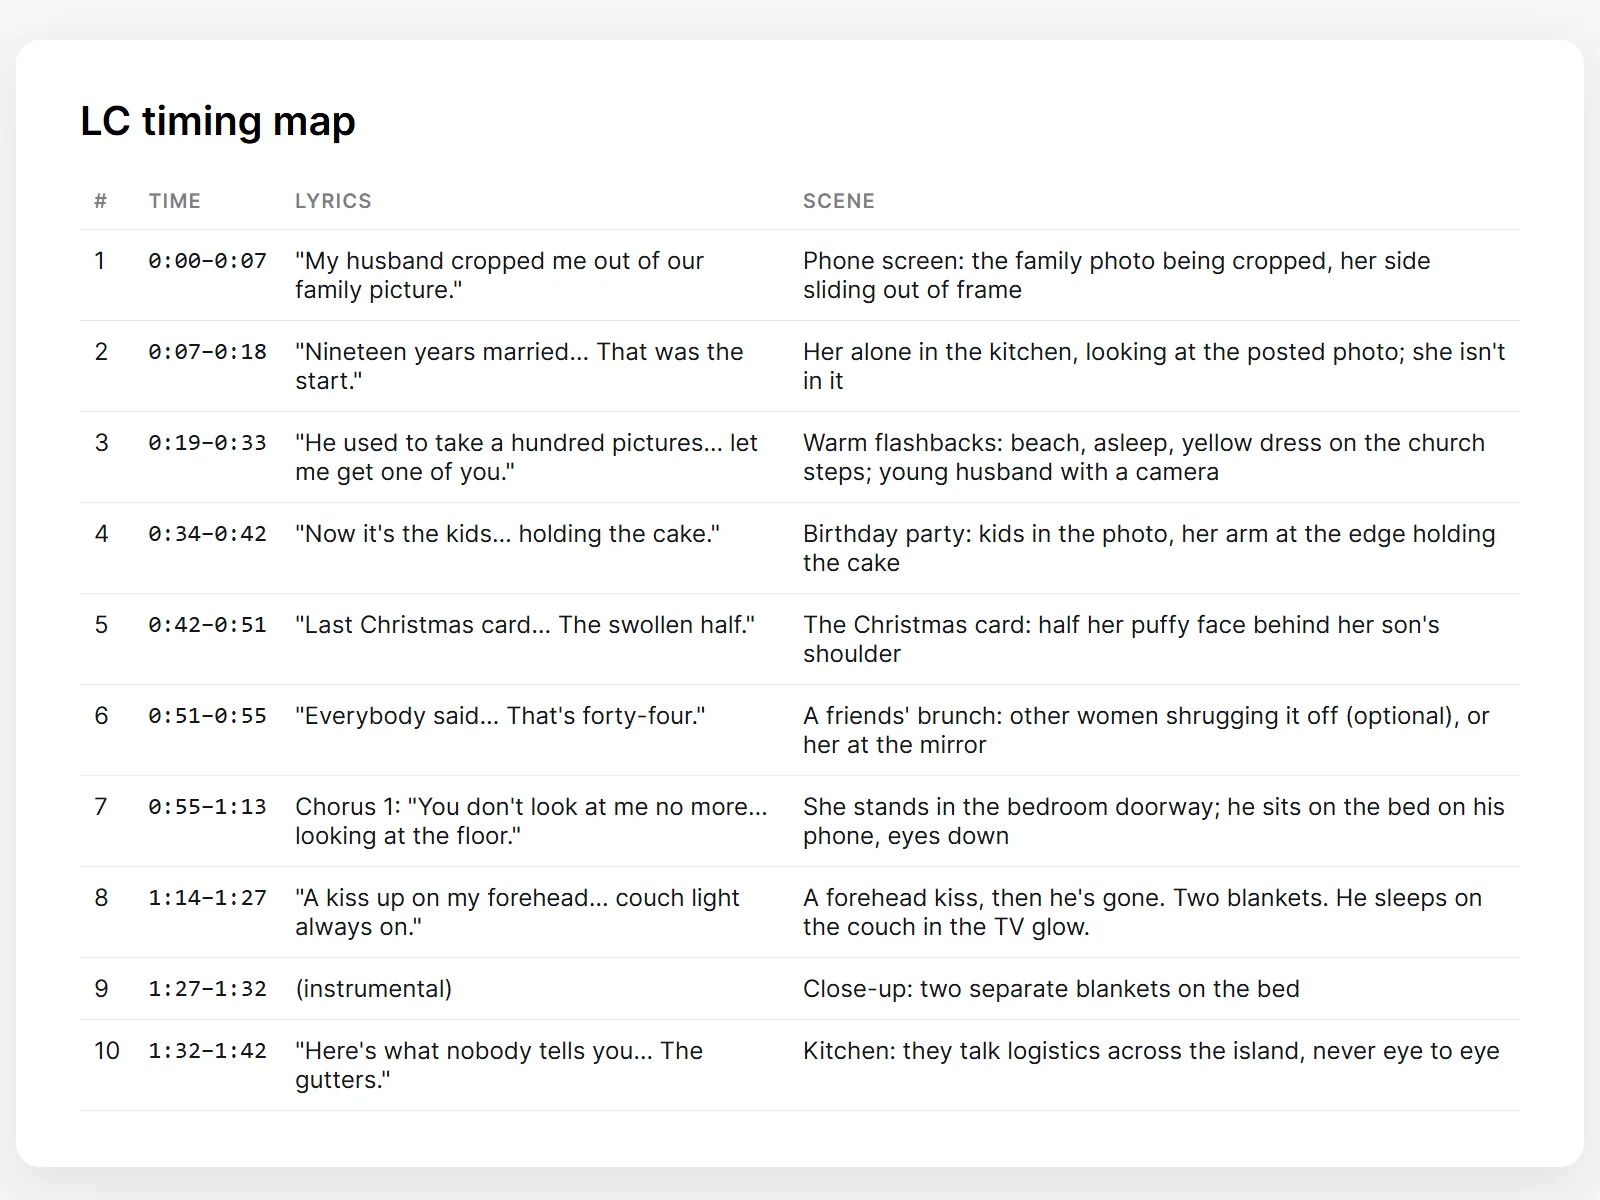
The timing map lists every line of the song with the second it starts and the second it ends.
To build it, have Claude run the song through Whisper locally with word timestamps. Take the timestamps from Whisper and the words from your script, because Whisper mishears sung lyrics.
The video model can only make clips of limited length, so the song gets cut into chunks. The timing map tells you exactly which lines each chunk covers and how long it has to be.
Stage 4: character sheets
List every character in the script and make a character sheet for each one. A character sheet shows the same character four times on a plain background: a close-up of the face, a full body front view, and two three-quarter views.
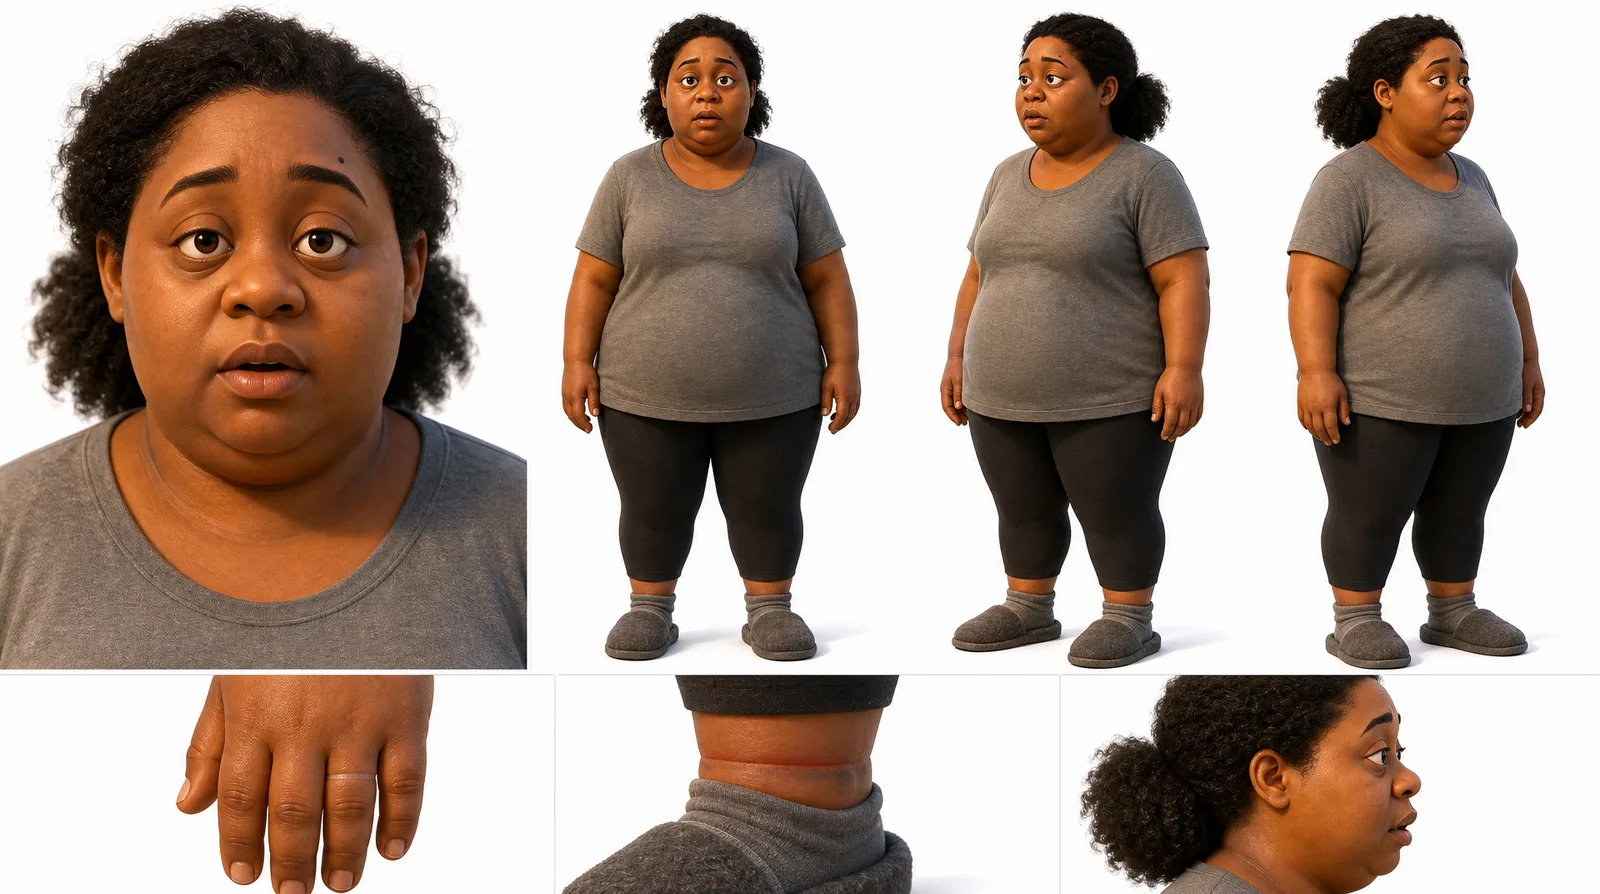
When a character changes during the story, make another sheet. Example: the narrator before and after her transformation.
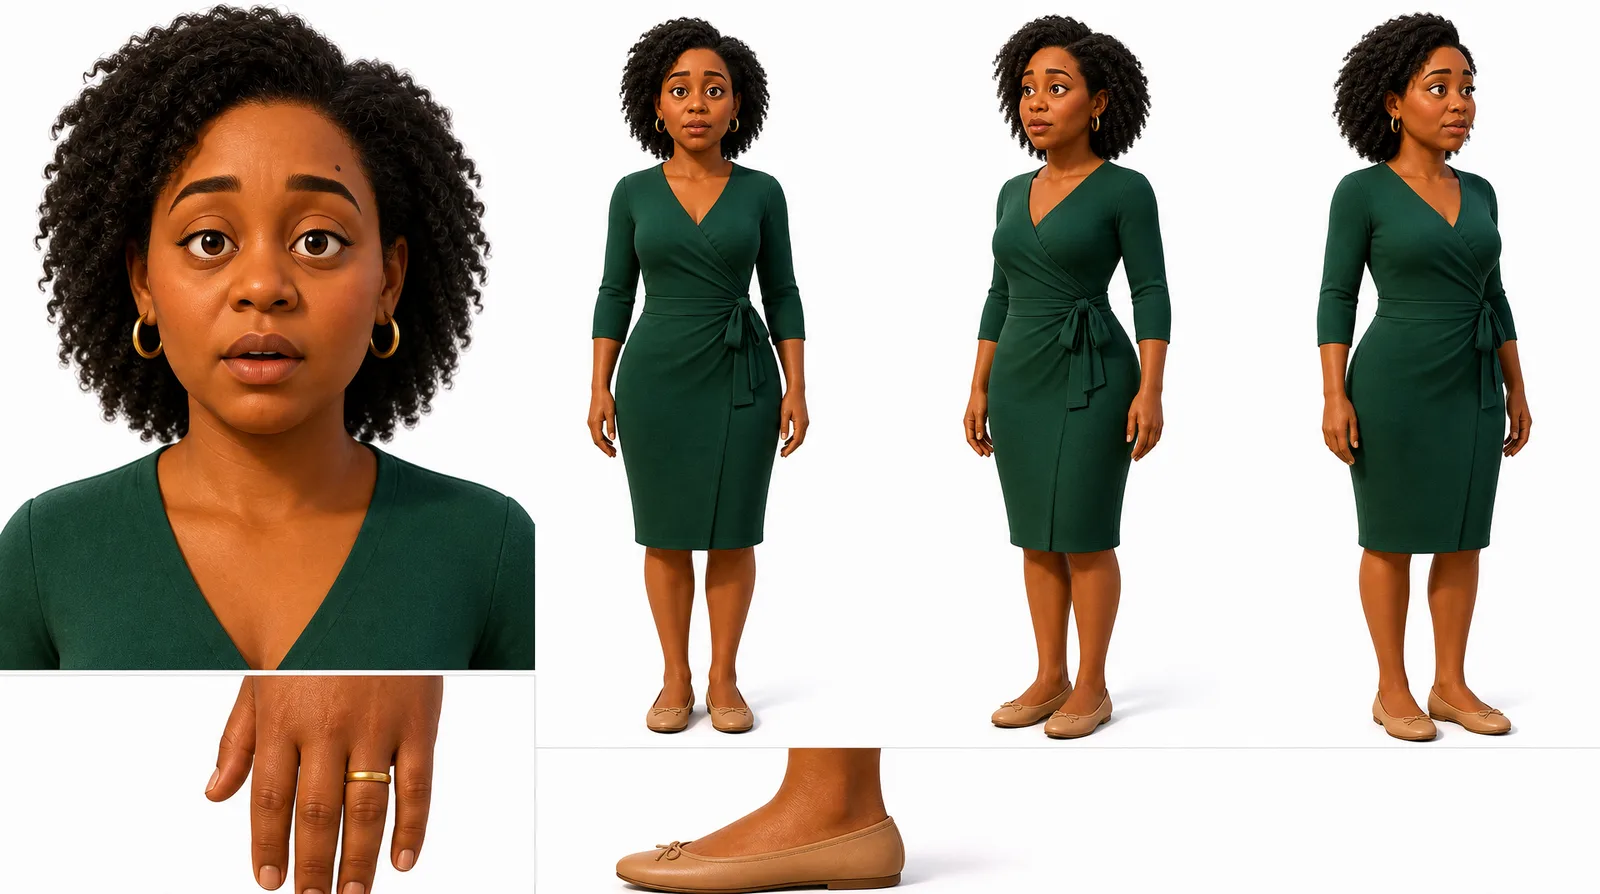
Smaller changes, like a new outfit in one scene, can go straight into the prompt while you keep using the same sheet.
Use 3D animation in the look of an animated feature film unless you want something else, like claymation or a realistic look. Describe the look in the prompt and keep that description identical in every image and video prompt.
Generate the images with GPT Image 2, which holds characters consistent. Nano Banana Pro also works if you want to save credits. Weaker image models make the whole ad look cheap.
Stage 5: shot sheets
Build the shots as shot sheets instead of single images. A shot sheet is one image split into a grid of four frames, and each frame is a moment of the same shot.
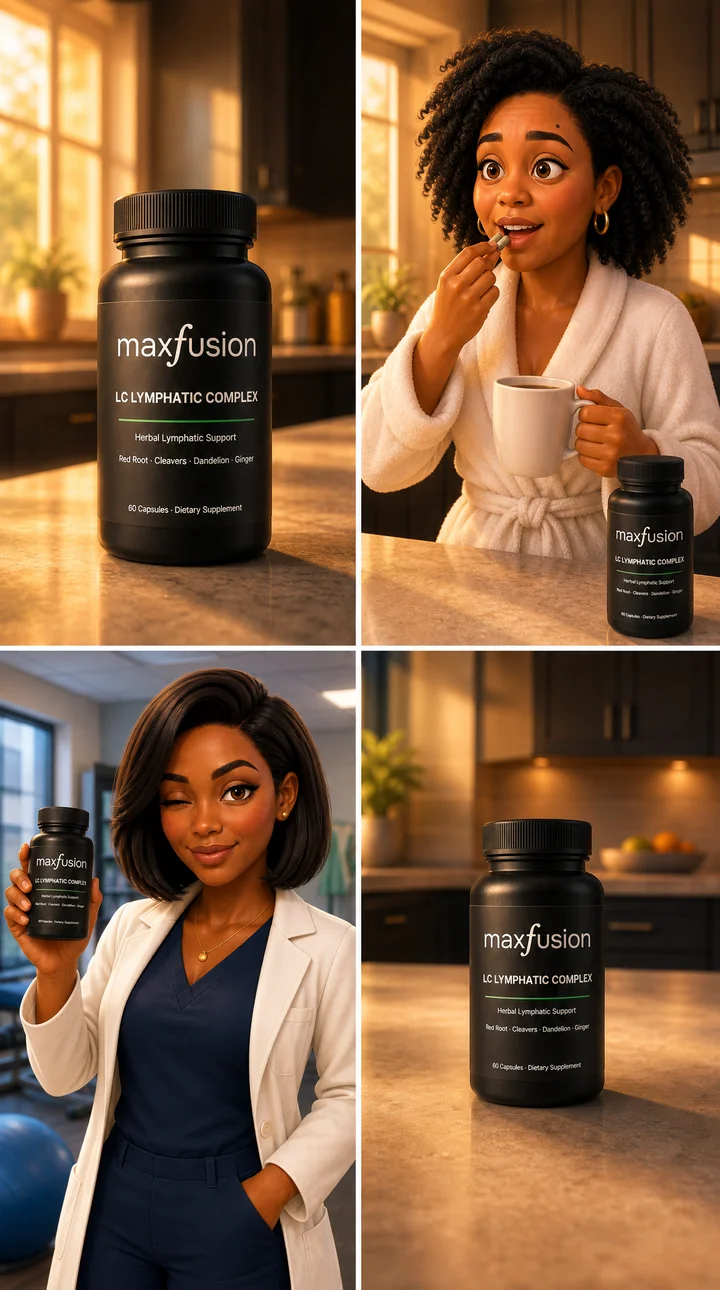
Plan the shots from the timing map, so each sheet covers the lines sung in its chunk of the song. In the prompt, describe the setting once, then each of the four frames: where the camera is and the one action happening in it. Attach the character sheets for everyone in the shot, and the product image when the product appears.
Generate one sheet first and check it before you make the rest.
Stage 6: the videos
Turn each shot sheet into a video clip with Seedance 2.0. Attach the shot sheet and the character sheets as references. In the prompt, tell the model the shot sheet is a storyboard to follow and that it must never appear in the video, then give the timing of each frame inside the clip. Say it again as the last line of the prompt.
Seedance 2.0 is cheaper than Seedance 2.5 and still gets the work done. Its reasoning is strong enough to read a shot sheet and turn it into well-directed shots. There is a small risk that the grid itself shows up in the video, but with Seedance 2.0 this rarely happens.
Cheaper, weaker video models end up costing more. They produce so many bad clips that one ad can take hundreds of generations.
Set the length of each clip from the timing map, never from a fixed number. Every clip has to match the words it covers, so one might be eight seconds and the next fourteen.
Keep the clips silent. The song goes on in the edit.
Generate the first one or two clips on their own and check them before you send the rest in small batches. It’s tempting to send everything at once, but small batches catch a problem before it repeats across the whole ad.
Stage 7: the edit
You can edit the clips yourself from the Maxfusion project, or have Claude do it locally with ffmpeg.
Claude cuts each clip to its exact slot in the timing map, puts them in order, and lays the song underneath as the only audio. Check the start of every clip, because a clip can open on a flash of the shot sheet or a still frame, and trim those frames off.
Don’t wait for the last clip to start editing. Once the first few minutes of clips are ready, stitch that section and watch it. Fixes are cheaper while the rest is still being made.
Add captions at the end with Max Captions.
" height="57.25593113035147px" id="pFbN4t6nI" transform="translate(73 0)" width="138.9190010986328px"/><path d="M 58.958 24.529 L 67.611 12.149 L 59.372 0.274 L 64.067 0.274 L 70.234 9.479 L 76.217 0.274 L 80.774 0.274 L 72.58 12.287 L 81.37 24.529 L 76.723 24.529 L 70.003 15.279 L 63.375 24.529 L 58.957 24.529 Z M 44.566 24.809 C 43.479 24.811 42.396 24.671 41.345 24.394 C 40.359 24.1 39.426 23.649 38.583 23.059 C 37.789 22.45 37.131 21.682 36.65 20.804 C 36.19 19.884 35.96 18.824 35.96 17.628 C 35.96 16.248 36.205 15.082 36.696 14.13 C 37.218 13.18 37.908 12.427 38.768 11.875 C 39.627 11.323 40.624 10.924 41.759 10.679 C 42.924 10.43 44.112 10.306 45.303 10.31 L 52.437 10.31 C 52.437 8.93 52.237 7.733 51.838 6.72 C 51.47 5.708 50.857 4.926 49.998 4.373 C 49.138 3.79 48.003 3.499 46.592 3.499 C 45.786 3.493 44.982 3.585 44.198 3.775 C 43.462 3.959 42.833 4.251 42.311 4.649 C 41.79 5.049 41.406 5.585 41.161 6.26 L 36.972 6.26 C 37.187 5.156 37.602 4.22 38.215 3.453 C 38.848 2.664 39.63 2.008 40.516 1.52 C 41.436 0.998 42.419 0.615 43.462 0.37 C 44.487 0.126 45.538 0.002 46.592 0 C 50.09 0 52.575 1.029 54.048 3.085 C 55.52 5.14 56.257 7.917 56.257 11.415 L 56.257 24.532 L 52.989 24.532 L 52.759 21.448 C 52.084 22.368 51.271 23.075 50.319 23.565 C 49.397 24.047 48.402 24.373 47.374 24.532 C 46.449 24.711 45.509 24.803 44.566 24.808 Z M 44.935 21.356 C 46.469 21.356 47.788 21.111 48.893 20.62 C 50.028 20.098 50.903 19.347 51.516 18.365 C 52.13 17.383 52.436 16.186 52.436 14.775 L 52.436 13.578 L 48.156 13.578 C 47.144 13.578 46.146 13.593 45.165 13.624 C 44.183 13.654 43.293 13.778 42.495 13.992 C 41.698 14.207 41.053 14.575 40.562 15.097 C 40.102 15.618 39.872 16.37 39.872 17.352 C 39.872 18.272 40.102 19.024 40.562 19.607 C 41.053 20.19 41.682 20.635 42.449 20.942 C 43.249 21.218 44.089 21.358 44.935 21.356 Z M 0 24.532 L 0 0.277 L 3.774 0.277 L 3.958 3.177 C 4.48 2.44 5.063 1.842 5.707 1.382 C 6.381 0.922 7.128 0.58 7.917 0.369 C 8.769 0.12 9.652 -0.004 10.54 0.001 C 12.227 0.001 13.593 0.369 14.636 1.105 C 15.669 1.799 16.483 2.773 16.983 3.913 C 17.505 3.119 18.141 2.405 18.87 1.796 C 19.602 1.216 20.427 0.764 21.31 0.461 C 22.23 0.154 23.242 0.001 24.347 0.001 C 26.127 0.001 27.553 0.384 28.627 1.151 C 29.732 1.919 30.53 2.961 31.02 4.281 C 31.511 5.57 31.757 7.027 31.757 8.653 L 31.757 24.532 L 27.845 24.532 L 27.845 10.632 C 27.845 9.835 27.799 9.022 27.707 8.193 C 27.654 7.4 27.467 6.622 27.154 5.892 C 26.848 5.156 26.387 4.572 25.774 4.143 C 25.191 3.683 24.362 3.453 23.288 3.453 C 22.276 3.453 21.417 3.698 20.711 4.189 C 20.036 4.649 19.484 5.279 19.054 6.076 C 18.621 6.885 18.311 7.754 18.134 8.654 C 17.95 9.544 17.858 10.434 17.858 11.323 L 17.858 24.532 L 13.945 24.532 L 13.945 10.586 C 13.945 9.819 13.899 9.022 13.807 8.193 C 13.755 7.405 13.584 6.629 13.301 5.892 C 13.076 5.183 12.623 4.568 12.012 4.143 C 11.429 3.683 10.616 3.453 9.573 3.453 C 8.1 3.453 6.95 3.883 6.121 4.741 C 5.293 5.57 4.71 6.598 4.372 7.825 C 4.07 8.982 3.916 10.173 3.912 11.369 L 3.912 24.532 Z" fill="rgb(21, 22, 27)" height="24.80901853219235px" id="Dy5HPNSvH" transform="translate(0 18.5)" width="81.37000073242189px"/></g></svg>)
" height="32px" id="VmykzZzNe" width="32px"/></svg>)
" height="30.633213969252477px" id="w5KefWMGh" transform="translate(0 1)" width="32px"/></svg>)
" height="32px" id="KxxfrbxU7" width="32px"/></g></svg>)
" height="22.41686631528509px" id="wfz7J8dwQ" transform="translate(0 5)" width="32px"/></svg>)
" height="57.25593113035147px" id="ZNNxR3481" transform="translate(73 0)" width="138.9190010986328px"/><path d="M 58.958 24.529 L 67.611 12.149 L 59.372 0.274 L 64.067 0.274 L 70.234 9.479 L 76.217 0.274 L 80.774 0.274 L 72.58 12.287 L 81.37 24.529 L 76.723 24.529 L 70.003 15.279 L 63.375 24.529 L 58.957 24.529 Z M 44.566 24.809 C 43.479 24.811 42.396 24.671 41.345 24.394 C 40.359 24.1 39.426 23.649 38.583 23.059 C 37.789 22.45 37.131 21.682 36.65 20.804 C 36.19 19.884 35.96 18.824 35.96 17.628 C 35.96 16.248 36.205 15.082 36.696 14.13 C 37.218 13.18 37.908 12.427 38.768 11.875 C 39.627 11.323 40.624 10.924 41.759 10.679 C 42.924 10.43 44.112 10.306 45.303 10.31 L 52.437 10.31 C 52.437 8.93 52.237 7.733 51.838 6.72 C 51.47 5.708 50.857 4.926 49.998 4.373 C 49.138 3.79 48.003 3.499 46.592 3.499 C 45.786 3.493 44.982 3.585 44.198 3.775 C 43.462 3.959 42.833 4.251 42.311 4.649 C 41.79 5.049 41.406 5.585 41.161 6.26 L 36.972 6.26 C 37.187 5.156 37.602 4.22 38.215 3.453 C 38.848 2.664 39.63 2.008 40.516 1.52 C 41.436 0.998 42.419 0.615 43.462 0.37 C 44.487 0.126 45.538 0.002 46.592 0 C 50.09 0 52.575 1.029 54.048 3.085 C 55.52 5.14 56.257 7.917 56.257 11.415 L 56.257 24.532 L 52.989 24.532 L 52.759 21.448 C 52.084 22.368 51.271 23.075 50.319 23.565 C 49.397 24.047 48.402 24.373 47.374 24.532 C 46.449 24.711 45.509 24.803 44.566 24.808 Z M 44.935 21.356 C 46.469 21.356 47.788 21.111 48.893 20.62 C 50.028 20.098 50.903 19.347 51.516 18.365 C 52.13 17.383 52.436 16.186 52.436 14.775 L 52.436 13.578 L 48.156 13.578 C 47.144 13.578 46.146 13.593 45.165 13.624 C 44.183 13.654 43.293 13.778 42.495 13.992 C 41.698 14.207 41.053 14.575 40.562 15.097 C 40.102 15.618 39.872 16.37 39.872 17.352 C 39.872 18.272 40.102 19.024 40.562 19.607 C 41.053 20.19 41.682 20.635 42.449 20.942 C 43.249 21.218 44.089 21.358 44.935 21.356 Z M 0 24.532 L 0 0.277 L 3.774 0.277 L 3.958 3.177 C 4.48 2.44 5.063 1.842 5.707 1.382 C 6.381 0.922 7.128 0.58 7.917 0.369 C 8.769 0.12 9.652 -0.004 10.54 0.001 C 12.227 0.001 13.593 0.369 14.636 1.105 C 15.669 1.799 16.483 2.773 16.983 3.913 C 17.505 3.119 18.141 2.405 18.87 1.796 C 19.602 1.216 20.427 0.764 21.31 0.461 C 22.23 0.154 23.242 0.001 24.347 0.001 C 26.127 0.001 27.553 0.384 28.627 1.151 C 29.732 1.919 30.53 2.961 31.02 4.281 C 31.511 5.57 31.757 7.027 31.757 8.653 L 31.757 24.532 L 27.845 24.532 L 27.845 10.632 C 27.845 9.835 27.799 9.022 27.707 8.193 C 27.654 7.4 27.467 6.622 27.154 5.892 C 26.848 5.156 26.387 4.572 25.774 4.143 C 25.191 3.683 24.362 3.453 23.288 3.453 C 22.276 3.453 21.417 3.698 20.711 4.189 C 20.036 4.649 19.484 5.279 19.054 6.076 C 18.621 6.885 18.311 7.754 18.134 8.654 C 17.95 9.544 17.858 10.434 17.858 11.323 L 17.858 24.532 L 13.945 24.532 L 13.945 10.586 C 13.945 9.819 13.899 9.022 13.807 8.193 C 13.755 7.405 13.584 6.629 13.301 5.892 C 13.076 5.183 12.623 4.568 12.012 4.143 C 11.429 3.683 10.616 3.453 9.573 3.453 C 8.1 3.453 6.95 3.883 6.121 4.741 C 5.293 5.57 4.71 6.598 4.372 7.825 C 4.07 8.982 3.916 10.173 3.912 11.369 L 3.912 24.532 Z" fill="rgb(41, 42, 47)" height="24.80901853219235px" id="MB0beBzDo" transform="translate(0 18.5)" width="81.37000073242189px"/></g></svg>)